DNS is a naming system for computers that converts human readable domain names e.g. (infosecinstitute.com) into computer readable Ip-addresses. However some security vulnerabilites exist due to misconfigured DNS nameservers that can lead to information disclosure about the domain. This forms an important step of the Information stage during a Penetration test or Vulnerability assessment. In this article we will look at the following areas..
- DNS Basics
- Resource records and the Zone file
- DNS Lookup and Reverse DNS Lookup
- Understanding Wildcard Entries
- DNS Zone transfer
- DNS Bruteforcing
1) DNS Basics-DNS converts human readable domain names into IP-addresses. This is because domain names are much easier to remember than Ip-addresses . This process may take place through a local cache or through a zone file that is present on the server .A zone file is a file on the server that contains entries for different Resource Records (RR). These records can provide us a bunch of information about the domain. We will look more into Resource Records and the zone file in the next section.
So Let’s understand how DNS resolution works. Let’s say the user opens up the browser and types in infosecinstitute.com. It is now the responsibility of the DNS resolver in the user’s operating system to fetch the IP address. It first checks it’s local cache to see if it can find a record for the queried domain name. A cache usually contains a mapping of IP-addresses to hostnames which are saved during recent lookups so that the resolver does not have to fetch the IP address again and again. If it can’t find the IP address in it’s cache it queries the DNS server to see if it has a record for it. A DNS server is usually given to you by the ISP or you can manually set up a DNS server for yourself.If it still can’t find the IP Address then it goes through a process or recursive DNS query in which it queries different nameservers to get the IP-address of the domain. As soon as it finds the IP-address it returns the IP Address back to the user and also caches it for it’s future use.
Let’s do a quick demo. We are going to use the nslookup utility for this demo. Just type in the commands as shown in the figure below.
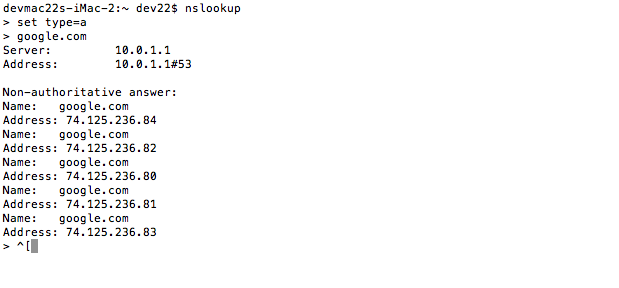
a)In the second line we set the type = a . This means that we are querying for the A records which will return us an Ip-address in return for the domain we query. We will look more into records in the next section.
b)As soon as we type in google.com we get an output showing the server and an Ip address#port. This server is basically the current DNS server that will be serving our request. In this case it is 10.0.1.1 and the port no is 53. This is because DNS uses UDP port 53 to serve its requests. We can also set the current DNS server by using the command “server Ip-address”
c) The third line in the output shows “Non-authoritative answer”. This basically means that our DNS server queried an external DNS server to fetch the Ip-address. Below we can see all the Ip-addresses associated with google.com. This is usually the case with large organizations. They use multiple servers to serve the request as one server is generally not capable of handling all the requests.
QUICK EXERCISE- Set the current server to ns1.google.com by using the command “server ns1.google.com”, and see if you still get “Non-Authoritative answer” in the output for a query for the domain google.com. Also explore the tool Dig and see if you can do the above exercise Dig.
2)Resource Records and the Zone file -A Zone file is basically a text file present on the server hosting the domain that contains entries for different resource records. Each line is represented by a different record .In some cases these records may exceed one line and hence must be enclosed within a parantheses. Each zone file must start with a Start of Authority (SOA) record containing an authoritative nameserver for the domain (for e.g. ns1.google.com for google.com ) and an email address of someone responsible for the management of the nameserver. An example of a zone file is given below.
1 2 3 4 5 6 7 8 9 10 11 12 13 14 15 16 | |
a)As we can see that it contains a TTL value in the second line, this means that all the resource records have an expiration time of 1hr, after this time every record will have to make another query and refresh it’s data.
b)We can also see the different records that are present in the zone file. The general way of writing a resource record is writing the domain name, record class, record type, and then some additional information.
Different types of Resource Records exist within a Zone file. However we are going to discuss some of the important ones
- A Records- Maps an IP Address to a hostname.For eg. 74.125.236.80 for google.com.
- NS Records-Delegates a given zone to use the given authoritative nameserver. For e.g. ns1.google.com is an authoritative nameserver for google.com
- MX Records-This basically tells us which server is responsible for receiving mails sent to that domain name.
- TXT Records-This consists of arbitrarily human readable text in a record.
- CNAME Records- Gives an alias of one name to another.
Let’s do a demo to make this clear. I have purposely added some records in my website searching-eye.com for this article,so they may not be available when you perform this, however you can try the same exercise on other domains, type in the commands as shown in the figure below.
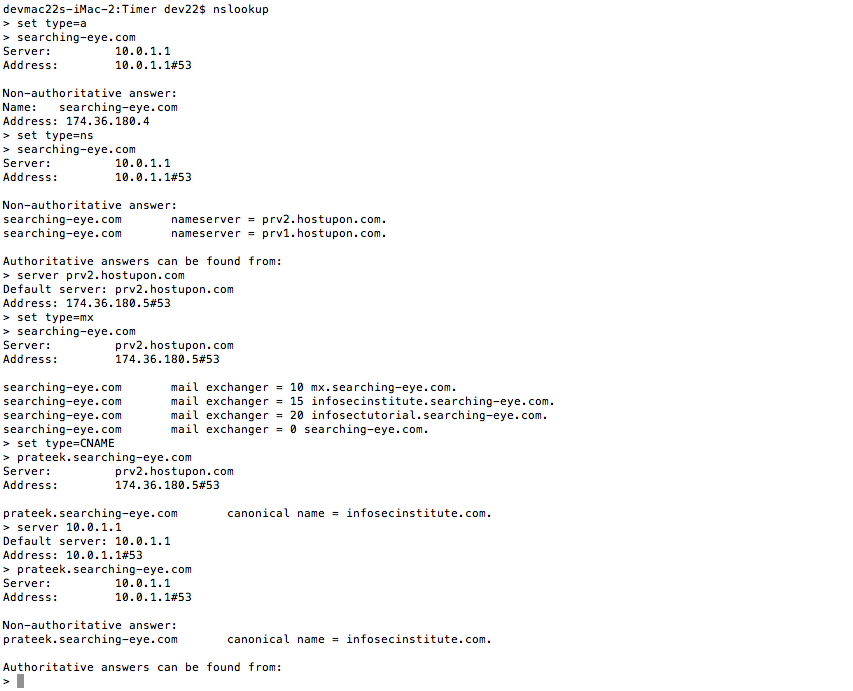
a) In the first command in nslookup I set the type to A which means I want Ip-address for a particular domain. I type in the domain name as the second command and get the corresponding Ip-address for it.
b) In the third command i set the type to NS as i am interested in finding the nameservers for searching-eye.com. Type in the domain name as the fourth command and we get the corresponding nameservers for the domain searching-eye.com. Note that finding the nameservers can give us some information about the hosting provider of the domain. Some large organizations use their own nameservers e.g. ns2.google.com.
c)I now set the current server to one of the nameservers, this is because I am interested in finding the latest information about the domain. Note that querying from your own dns server may not give you the accurate information everytime. I set the type to MX and again type in the domain name. What we get is a list of mail servers responsible for handling emails sent to that domain. The number before them denotes the priority with which to fetch mails. Lower the number, higher the priority.
d)Next i set the type to CNAME and type in a subdomain, i get a cannonical name as infosecinstitute.com. This means any request to the queried domain (in this case prateek.searching-eye.com) will be redirected to infosecinstitute.com.
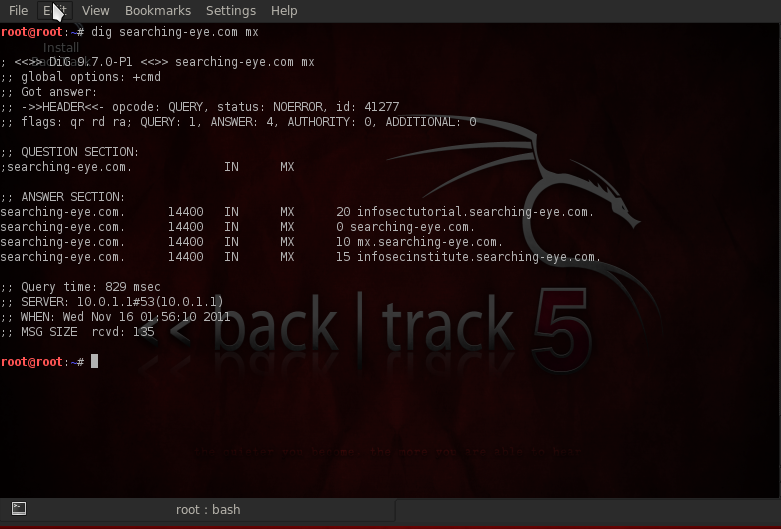
I will take this moment to introduce DIG which is a handy little tool, we can also do the same queries using DIG. Let’s search for MX records in the same domain. I would suggest you try querying for the other domains yourself.
3)DNS Lookup and Reverse DNS Lookup
DNS Lookup-Let’s peform a DNS Lookup ourselves for infosecinstitute.com. We will do this by traversing the entire DNS hierarchy from the root servers to the Top level domain. Open up the terminal in Backtrack (you can use your own favourite distro) and type in “dig”. You will get something as shown in the figure below.
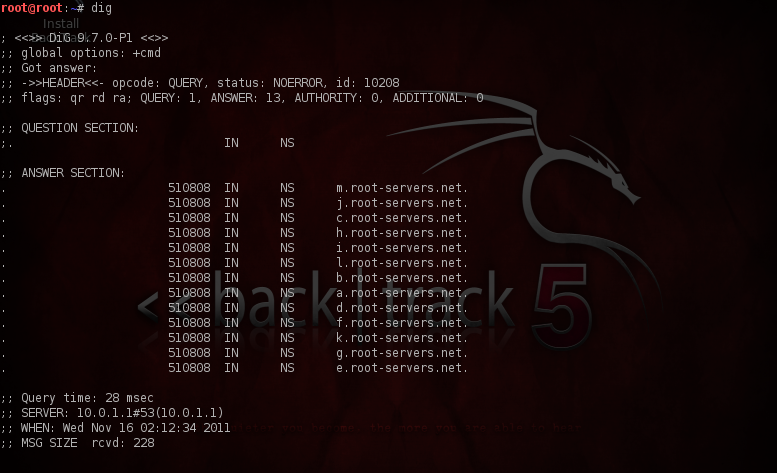
What we get is a list of the Root DNS Servers. Let’s use this root DNS server to query infosecinstitute.com. We do this as shown in the figure below
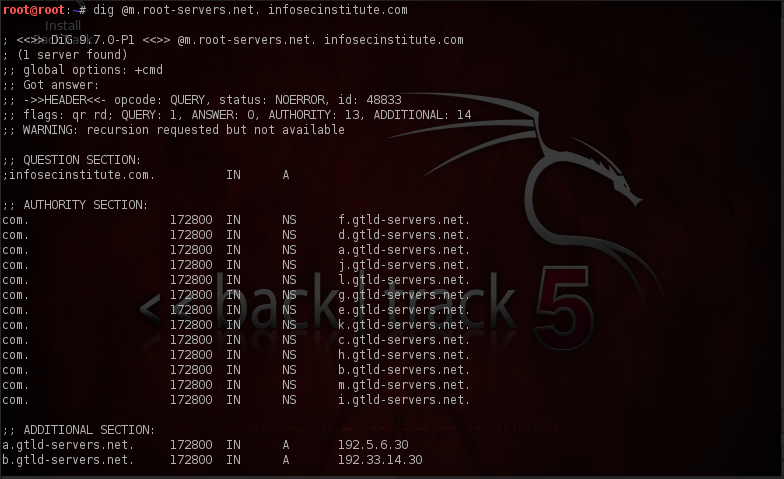
What we get is a list of authoritative name servers for the com domain. Notice the dot (.) at the end, this is what makes this a fully qualified domain name (FQDN). Let’s use these Name servers to query again.
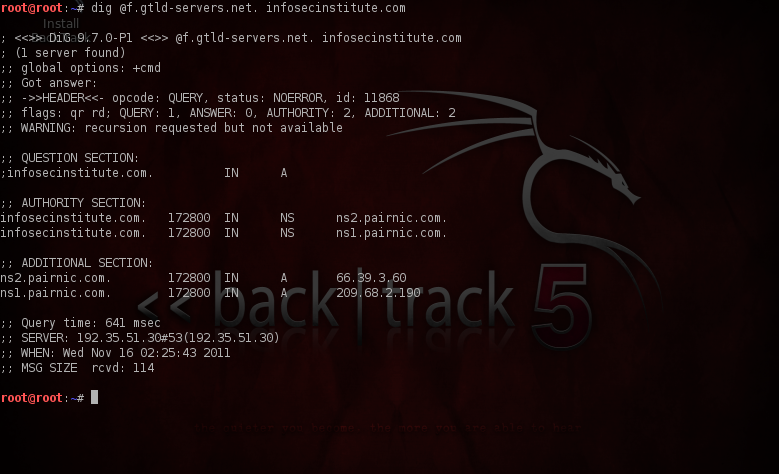
Now we get the list of authoritative name servers for infosecinstitute.com (which is ns1.pairnic.com and ns2.pairnic.com). Now we need to query these name servers to get the Ip-address of Infosecinstitute.com
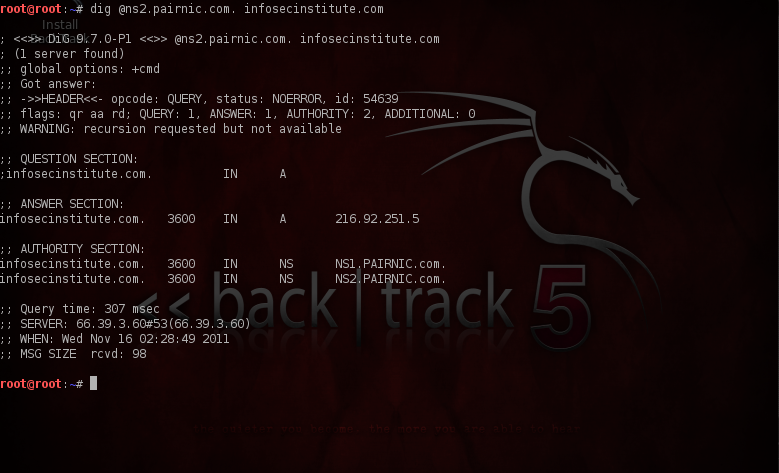
And now in the Answer Section we can see that the Ip-address for infosecinstitute.com is 216.92.251.5. SUCCESS !
Reverse DNS Lookup– Performing Reverse DNS Lookup converts an Ip-address into it’s hostname. For this we need to write the Ip address in reverse order (for eg 192.168.1.1 will be 1.1.168.192) and then append “.in-addr.arpa.” to it. Next we need to make a query for a PTR Record using DIG. Let’s make a DNS PTR query for 216.92.251.5, the command here would be “dig 5.251.92.216.in-addr.arpa PTR”
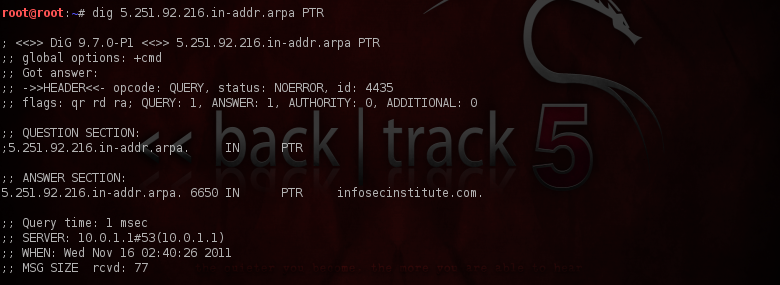
As we can clearly see, this ip address resolves to infosecinstitute.com. As Simple as that!
4) Understanding Wildcard Entries–
WildCard – A wildcard entry is used to provide responses for subdomains that do not exist. For e.g. let’s say we have a domain example.com. If we set a wildcard record for *.example.com and give it the value example.com then the requests for all the non-existent subdomains of example.com (for eg. abcd.example , blah.example.com) will point to example.com. In the information gathering stage of a penetration test of a website, it is important to identify the subdomains and the Ip-addresses corresponding to them. Introducing a Wildcard feature reduces this to a small extent.
Bypassing Wildcard entries – In case wildcard entries are set on a particular domain, it could be bypassed to reveal information about it’s subdomains. This is done by bruteforcing the subdomains. We have a wordlist in which we contain the subdomain names we want to test the domain against. Then we do a ping of all these subdomains, if these domains resolve to an Ip-address different than the host Ip address, then we can very surely say that this subdomain actually exists.However before performing a brute force it would be better to actually check if Wildcard entries are enabled or not. For that we can ping some random subdomains for e.g. 434234.example.com and see if it’s IP-address is the same as the host IP-address(in this case example.com). If this is the case for some random subdomains, then we can clearly say that Wildcard entries are enabled for this domain. We will perform a demo of this in the coming section.
5)DNS Zone Transfer-We saw in the previous exercises that every domain has some authoritative nameservers associated with it. For eg in the case of google.com, the nameservers were ns1.google.com to ns4.google.com .These Nameservers are used for handling requests related to the domain google.com. Let’s say we have a domain example.com and it has it’s two nameservers as ns1.example.com and ns2.example.com. Usually a big organization will have more than one nameservers so that if one goes down for some time, the other one is ready to back it up and handle the requests. Usually one of these servers will be the Master server and the other one will be the slave server. Hence to stay in sync with each other, the slave server must query the Master server and fetch the latest records. The Master server will provide the slave server with all the information it has. This is basically what is called a “Zone Transfer”. It’s like asking the nameserver “Give me everything you have”. A properly configured nameserver should only be allowed to server requests of Zone transfer from other Nameservers of the same domain. However if the server is not configured properly it will serve all requests of Zone transfer made to it without checking the querying client .This leads to leakage of valuable information. DNS Zone transfer is sometimes referred through it’s opcode mnemonic AXFR.
Let’s see an example of a Zone transfer. We will be using the tool Fierce present by default in Backtrack. Fierce is one of the best tools available out there for DNS Analysis. Type in the following command “perl fierce.pl -dns searching-eye.com”. We get something as shown in the figure below.
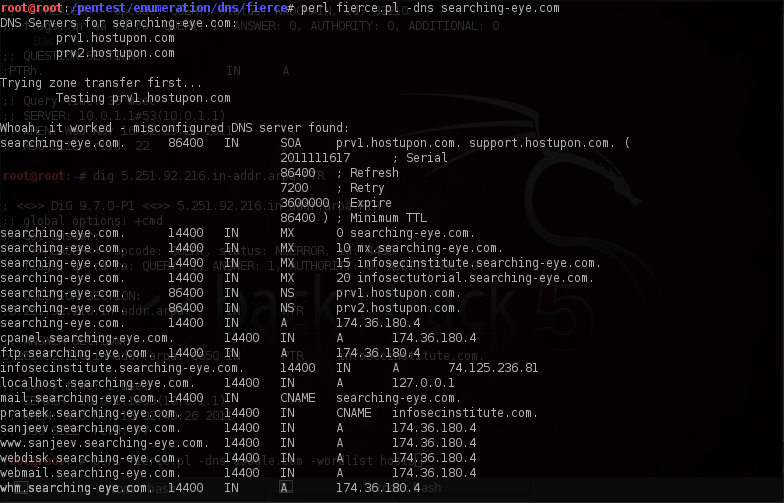

What fierce does is that it first finds out the nameservers for the domain. It then checks to see if they allow zone transfers. Since one of the nameservers is not properly configured, it allows zone transfer and what we see is a dump of all the information (records , subdomains etc).
Why is Zone transfer a Security Issue?
A zone transfer reveals a lot of information about the domain. This forms a very important part of the “Information Gathering” stage during a penetration test, vulnerability assessment etc. We can figure out a lot of things by looking at the dump.For eg. we can find different subdomains. Some of them might be running on different servers.Those server may not be fully patched and hence be vulnerable.From this point, we can start thinking about Metasploit ,Nessus,Nmap etc and do a full vulnerability assessment of the domain. Hence This kind of information increases our attack vector by a fair amount, an amount which cannot be ignored.
To protect your nameservers from leaking valuable information, one must allow zone transfer to other nameservers of the same domain only . For eg. ns1.example.com should allow zone transfer to ns2.example.com only and discard all the other requests.
6)DNS Bruteforcing-DNS Zone transfers may not work all the time. In fact, it will not work most of the time. Most of the DNS servers are properly configured and do not allow zone transfers to every client. Well what do we do then ? Simple answer, the same thing we do when nothing works, BRUTE FORCE it ! Basically we have a wordlist containing a huge list of hosts. We first check for wildcard entries by checking if a random subdomain for e.g. 132qdssac.example.com resolves to the same IP-address as example.com .If this is the case, we know Wildcard entries are set. We then query the domain by using each of the word in our wordlist. For e.g. if one of the entries in the wordlist file is “ads” , then we make a query for ads.example.com. If it resolves to a different IP-address then we are sure that this subdomain actually exists. Hence we now have information about the name of subdomain and it’s Ip-address. If wildcard entries are not set , we do the same thing and see if we get response from any subdomain we query. If we get a response back, we could be sure that the subdomain actually exists. In the end what we get is a bunch of information about the domain.
Let’s see this through a demo. We will again use the tool “Fierce”. Fierce is a very handy tool for DNS Analysis and it is something everyone should have in their armory. Fierce will first check if Zone transfers are allowed or not, if zone transfers are allowed, it will dump all the information and exit happily, otherwise it will bruteforce it. We need to supply Fierce with a wordlist containing a list of all the possible subdomain names (for e.g. hosts,ads,contracts). Fierce comes with an inbuilt wordlist file “hosts.txt” and we will be using the same for our demo.
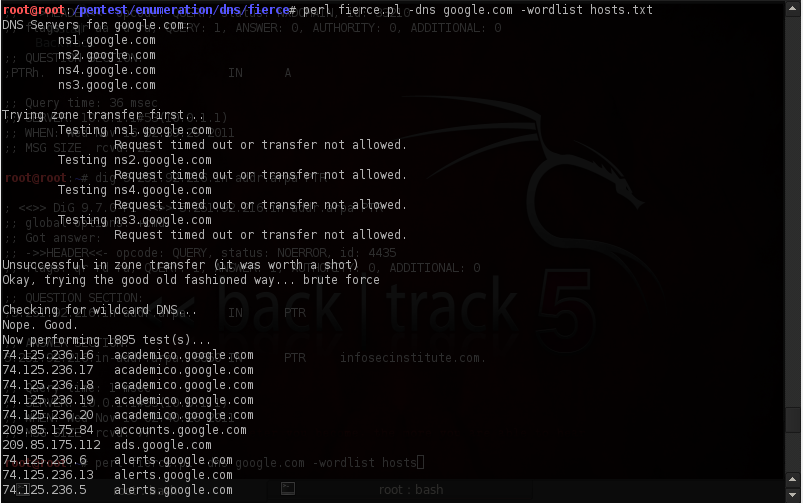
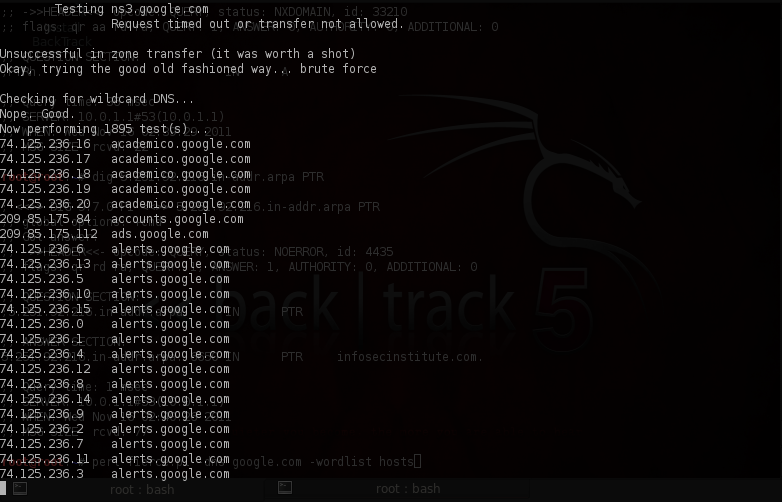
As we can see, Fierce dumps out information about the subdomains of google.com
CONCLUSION
DNS protocol is a very critical component of the Internet as it resolves IP address into hostnames and makes life easier for us. However, if the nameservers are not properly configured they might leak out the whole DNS server database to any malicious hacker. Even if the servers are properly configured, they can be bruteforced to leak information about their mail servers, IP addresses, etc. It is therefore important to properly configure your DNS servers and be aware of the security issues with DNS.
This article was originally published on the resources page at Infosec Institute. For more information, please visit my author page.